
Migrating to JavaScript Runtime Version 2
Bixby provides two JavaScript runtime systems your capsule's action implementations can execute on:
- Version 1 is built on Mozilla Rhino, a legacy engine with limited support for language features introduced after ECMAScript 5.1 (2011). This version is deprecated, and you should upgrade to version 2.
- Version 2 is built on Google V8, the engine that powers Node.js. This offers compatibility with more modern JavaScript through the ES 2020 (11th Edition) specification, and provides a faster, more secure foundation for your capsule's execution.
This guide gives some pointers on migrating your capsule from Version 1 to Version 2.
JavaScript Runtime Selection
The Javascript Runtime selection is "all or nothing": all your capsule's JavaScript will run on the same runtime system. There is no way to specify the engine on a per-function or per-file basis.
The JavaScript runtime version is set by the js-runtime-version key in your capsule.bxb file:
capsule {
  runtime-version (7) {
    js-runtime-version (2)
  }
}
If this key is not specified, the runtime version will default to the version set by the current runtime-version of the capsule. (Currently, this will always be Version 2.)
For more information on the security enhancements made to JavaScript Runtime version 2, see The Bixby Serverless Execution Infrastructure whitepaper.
API Differences
There are several differences between JavaScript Runtime V1 and V2 to be aware of, both when migrating code manually between runtime versions and when reviewing examples in Bixby documentation.
Importing Modules
In JavaScript Runtime V1, modules (both ones contained in your capsule and Bixby's JavaScript API modules) are imported using the non-standard require() function:
var http = require('http')In V2, you should use the standard module import syntax:
import http from 'http'

import niftyModule from './lib/nifty'
You cannot import a constant directly, but you can set a constant from an imported module's constant after import:
import niftyModule from './lib/nifty'

const FOOBAR = niftyModule.FOOBARYou cannot require or import modules dynamically based on the contents of a variable. Imported modules must be declared statically.
This will work:
// correct
import http from 'http'
Both of these will cause errors:
// will not work
const http = require(filename);

// will not work
import http from filename;
Function Arguments
Suppose your capsule has an action to find a Thing:
action (FindThing) {
  type (Search)
  collect {
    input (arg1) {
      type (Arg1)
    }
    input (arg2) {
      type (Arg2)
    }
  }
  output (Thing)
}
In V1, functions receive one or more parameters that correspond to the input keys in the action.
function findThing(arg1, arg2, $vivContext) {
  return main.findThing(arg1, arg2, $vivContext)
}
In V2, functions instead receive a single parameter, an object with key/value pairs whose keys correspond to the input keys in the action. You can use destructuring assignment to assign variables from these keys.
function findThing(input) {
  const { arg1, arg2, $vivContext } = input
  return main.findThing(arg1, arg2, $vivContext)
}JavaScript's destructuring assignment from object keys is based on order, not name. The keys will be in the order of input keys in the collect block, with the $vivContext key always being last.
Exporting Functions
In V1, functions are exported using CommonJS's module.exports method:
const main = require('./lib/main.js')

module.exports.function = function findThing(arg1, arg2, $vivContext) {
  return main.findThing(arg1, arg2, $vivContext)
}
In V2, functions are exported using the standard export syntax. You can specify the handler function as a default export:
import main from './lib/main.js'

export default function (input) {
  const { arg1, arg2, $vivContext } = input
  return main.findThing(arg1, arg2, $vivContext)
}While the standard JS export allows other formats, such as export const or arrow function notation, only export default or export function endpoint-name will work for V2 function exports.
This is the matching endpoint:
endpoints {
  action-endpoints {
    action-endpoint (FindThing) {
      local-endpoint (FindThing.js)
      accepted-inputs (arg1, arg2, $vivContext)
    }
  }
}
Rather than using the default export, you can give a function a name, and specify it in the local-endpoint key.
import main from './lib/main.js'

export function findThing(input) {
  const { arg1, arg2, $vivContext } = input
  return main.findThing(arg1, arg2, $vivContext)
}
The findThing function must be specified:
endpoints {
  action-endpoints {
    action-endpoint (FindThing) {
      local-endpoint (FindThing.js::findThing)
      accepted-inputs (arg1, arg2, $vivContext)
    }
  }
}
A single JavaScript file can export more than one named function, but can only export one default function.
Bixby API Library
Both runtime versions include a set of internal modules to provide new functions.
Versions 1 and 2 both include the following modules:
base64configconsolefailhttpmd5secrettextLibtransactiontypes
The only difference between runtime versions for these modules is the importing method.
// JS Runtime V1 import
var http = require('http')

// JS Runtime V2 import
import http from 'http'
V2 does not include the following modules:
datessoap
Replacing the dates Module
Most of the functionality from V1's dates module is designed for formatting dates and times in the user's timezone. In V2, dates can be handled by JavaScript's Date object, and formatted with the built-in Intl.DateTimeFormat API. For other date/time functionality, try using other methods in the global Intl object. If you are migrating an existing capsule, you can use the Dates Module Polyfill linked below.
When using the native Date object, the default timezone is UTC, not the user/device locale. If you need to use a date object with an embedded timezone, you will need to access $vivContext to find the user/device locale and timezone.
The following are specific topics about replacing the dates module:
- Formatting Dates and Times
- Replacing
getTimeZoneOffset() - Calculations With Date and Time
- Overriding Current DateTime in the Simulator
Formatting Dates and Times
You can use toLocaleString to format a Date object in a specific timezone and with specific options:
// create a new Date object set to 8 AM, September 16, 2022, PDT
const myDate = new Date('Sep 16, 2022, 8:00:00 AM GMT-7')

// returns 'Sep 17, 2022, 12:00:00 AM GMT+9'
formattedDate = myDate.toLocaleString('en-US', {
  dateStyle: 'medium',
  timeStyle: 'long',
  timeZone: 'Asia/Tokyo',
})
You can also use Intl.DateTimeFormat:
// create a new Date object set to 8 AM, September 16, 2022, PDT
const myDate = new Date('Sep 16, 2022, 8:00:00 AM GMT-7')

// returns 'Sep 17, 2022, 12:00:00 AM GMT+9'
formattedDate = new Intl.DateTimeFormat('en-US', {
  dateStyle: 'medium',
  timeStyle: 'long',
  timeZone: 'Asia/Tokyo',
}).format(myDate)
For a complete list of DateTimeFormat options, read about the Intl.DateTimeFormat() constructor.
To use the user's locale and timezone, access $vivContext:
// create a new Date object set to the current date and time (in UTC)
const myDate = new Date()

// return it formatted for the user's locale and timezone
formattedDate = myDate.toLocaleString($vivContext.locale, {
  dateStyle: 'medium',
  timeStyle: 'long',
  timeZone: $vivContext.timezone,
})
Replacing getTimeZoneOffset()
You can compute the timezone offset of a specified date and timezone in seconds by using Intl to format a date with the desired timezone and computing the difference with the UTC date. This example function is one approach.
function getTimeZoneOffset(utcDate, timeZone) {
  const options = {
    timeZone,
    calendar: 'iso8601',
    year: 'numeric',
    month: '2-digit',
    day: '2-digit',
    hour: '2-digit',
    minute: '2-digit',
    second: '2-digit',
    hour12: false,
  }
  const dateTimeFormat = new Intl.DateTimeFormat(undefined, options)
  const parts = dateTimeFormat.formatToParts(utcDate)

  const map = new Map(parts.map((x) => [x.type, x.value]))
  const year = map.get('year')
  const month = map.get('month') - 1 // Subtract one due to months counting from 0
  const day = map.get('day')
  const hour = map.get('hour')
  const minute = map.get('minute')
  const second = map.get('second')
  const ms = utcDate.getMilliseconds()
  const tzFormattedDate = new Date(year, month, day, hour, minute, second, ms)

  // Positive offset is ahead of UTC while negative offset is behind UTC
  return -(tzFormattedDate - utcDate) / 60 / 1000
}

// example usage
console.log(getTimeZoneOffset(new Date(), 'Asia/Seoul'))
Calculations With Date and Time
Calculations with date and time in JavaScript can be accomplished with get and set methods on Date objects:
function addHours(date, hours) {
  date.setHours(date.getHours() + hours)
}
function addDays(date, days) {
  date.setHours(date.getHours() + days * 24)
}
const event = new Date('August 19, 1975 23:15:30')

addDays(event, 1)
You can use the getTimeZoneOffset function described above to handle calculations across timezones.
Overriding Current DateTime in the Simulator
If you use the Simulator's GPS/Clock Override,
your capsule will need to explicitly check the $vivContext.testToday variable to receive the date/time set in the Simulator, given in milliseconds since January 1, 1970. This variable is undefined when the capsule is not running in the Simulator or the clock is not being overridden.
// set myDate to the real current time or the override in the Simulator
myDate = new Date($vivContext.testToday ?? Date.now())
Dates Module Polyfill
If you are migrating existing code from JavaScript Runtime Version 1 to Version 2 that makes extensive use of the dates module, a polyfill library is available to help with replicating ZonedDateTime functionality. It can be imported into your capsule like other modules:
import ZonedDateTime from 'zoned-date-time'You must initialize the ZonedDateTime class before using it by passing a $vivContext object to its setVivContext method, such as in the following example:
export function myAction(input) {
  const { arg1, arg2, $vivContext } = input

  ZonedDateTime.setVivContext($vivContext)
  const date = new ZonedDateTime()
}
The setVivContext() method should be called only once, and must be called in the function context before any other operation that uses the ZonedDateTime class.
You must be aware of the following differences between the ZonedDateTime polyfill for Runtime Version 2 and the dates library for RunTime Version 1:
- The
ZonedDateTimeconstructor takes atimeZoneIdas its first argument. If this is not provided, the class will use the timezone from$vivContext. Version 1's constructor could take either aGeoPointor atimeZoneId. If you are using theviv.geolibrary to obtain aGeoPoint, reference thetimeZoneproperty to obtain the correspondingtimeZoneIdstring. - The
ZonedDateTimeconstructor can take a second optional argument,millisecondsFromEpoch. If no epoch time is provided, it will default to the current time (in milliseconds from epoch time). - The
format()function cannot format the date as a string using a pattern argument. To format the date as a string, pass anIntl.DateTimeFormatoptions object. - The
parseDate(),parseTime(), andparseDateTime()functions cannot parse a string with a pattern argument as their second parameter. They take only two parameters: the input string, in ISO 8601 standard, and an optionaltimeZoneIdstring. Use the built-inDate.parse()method for pattern parsing.
Only use the polyfill library for migrating existing code. If you are starting a new Bixby capsule, use native Date objects as described above.
Replacing the soap Module
If your capsule needs to communicate with a web service via SOAP, you can use template literals to create the XML payload and send it to the remote server using http.postUrl(). By sending it with the xmljs format parameter, the returned XML will be translated into JSON.
import http from 'http'
import config from 'config'

export function handler(input) {
  const options = {
    format: 'xmljs',
    returnHeaders: true,
  }

  const soapMessage = `
    <soapenv:Envelope
      xmlns:soapenv="http://schemas.xmlsoap.org/soap/envelope/"
      xmlns:ord="http://...">
      <soapenv:Header/>
      <soapenv:Body>
        <ord:order>
          <ord:firstName>${recipient.firstName}</ord:firstName>
          <ord:lastName>${recipient.lastName}</ord:lastName>
          <ord:address>${recipient.address}</ord:address>
          <ord:deliveryDate>${deliveryDateStr}</ord:deliveryDate>
          <ord:product>
            <ord:sku>${product.sku}</ord:sku>
            <ord:quantity>1</ord:quantity>
          </ord:product>
          <ord:totalAmount>${charges}</ord:totalAmount>
        </ord:orders>
     </soapenv:Body>
   </soapenv:Envelope>`

  const response = http.postUrl(config.get('remote.url'), soapMessage, options)

  return response
}
JavaScript Language Notes
- JavaScript Runtime Version 1 supports all of JavaScript 5.1 and a limited number of features from JavaScript ES2015.
- JavaScript Runtime Version 2 fully supports JavaScript ES2020, with the exception of promises and
async/await, which are not supported.
Loop Construction
JavaScript 1.6's for each...in loop construction is not supported by V2; instead, use for...in:
const foo = { a: 10, b: 20 };

// DO NOT USE the unsupported for each...in style
for each (var x in foo) {
  console.log(x);
}

// use the supported for...in style
for (let key in foo) {
  let x = foo[key];
  console.log(x);
}Existing for each loops in your capsule will not be automatically migrated between V1 and V2.
ESLint Validation
Runtime Version 2 uses ESLint for detecting validation errors.
Bixby Developer Studio will not read .eslintignore or .eslintrc files. You can, however, use configuration comments for disabling rule warnings in a file. You can disable the following:
- A specific line:
// eslint-disable-next-line - Specific rules on a specific line:
// eslint-disable-next-line quotes - A block or an entire file:
/* eslint-disable quotes
This could be useful if your capsule includes an external library that will not otherwise pass validation.
Migration Assistance
Bixby Developer Studio can assist you in migrating from JavaScript Runtime Version 1 to Version 2. You'll see a message in the Warnings & Errors pane of the editor in your capsule.bxb file indicating that the V2 runtime is available and suggesting an upgrade with the Quick Fix option.
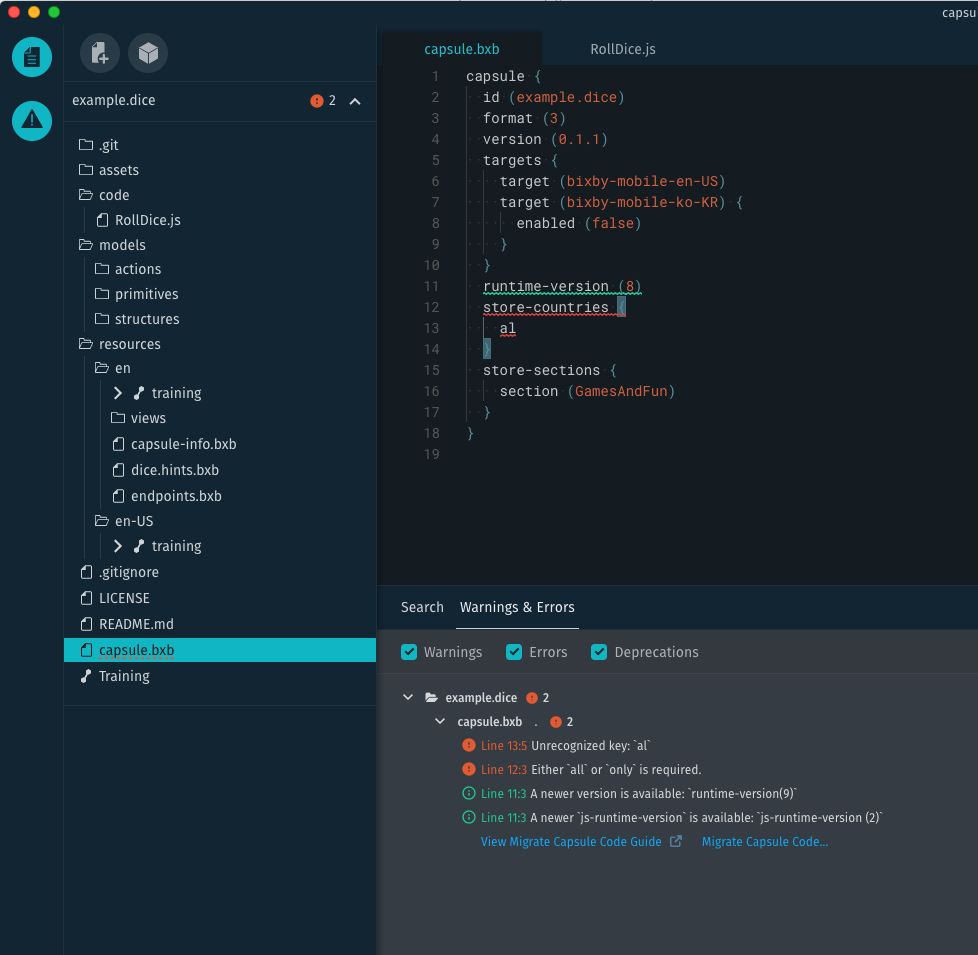
Click Migrate Capsule Code… to begin the migration process. Migrate to Latest JS Runtime… will also appear as an option in Bixby Studio's context menu when you right-click on the capsule in the file sidebar.
When the migration is complete, Bixby Studio will display a results page showing the following information:
- A list of successfully migrated files
- A list of any files that could not be automatically migrated
- The location of the backup file
If you have files that cannot be automatically migrated, such as ones using the V1 dates API, you can use the API Differences section of this document as a guide for making the necessary changes.