
Layout Components
In Creating Bixby Views, we've seen how layouts are built from smaller components: cards, cells, and various text objects like titles and paragraphs. Let's go into more detail about layout components and their containers.
Input views can use layouts, macros, and layout components in certain places. However, input views have their own distinct set of components. For a discussion of input components, read the Input Views section, which links to further documentation on individual components.
Components are placed within a content block under layout. A content block consists of one or more section blocks.
Each section block can itself have just two child keys:
title: The title that will be displayed for the section. Unlike titles within other components, this title cannot be styled (although it can be atemplate). This is optional, and only one is allowed for acontentblock.content: The actual components within this section.
A layout block has only one content block as a direct child; that content block can have multiple section blocks that each have one content block. So a layout with multiple sections would look like this:
layout {
  // the match directive for the overall layout
  match: Object (variable)

  content {
    section {
      content {
        // content for first section
      }
    }
    section {
      content {
        // content for second section
      }
    }
  }
}
The content block within a section contains one or more view components, which are divided into the following types:
Be aware of which components you are adding to your layouts and layout macros, because different components are available under different views. If you call a layout or layout macro in a view and that layout specifies a component that the view does not support, Bixby Developer Studio will throw an error. Similarly, you should consider which layout macros are being called within a layout itself. The same layout macro invoked in one component might not be valid if used within a different component, as the list of supported child components could differ.
You can read the Designing with Bixby Views Design Guide and the Building Bixby Views (UI) Developers' Guide to check if your layout is using the correct components for that moment and that view.
Areas
Areas are static components that display information to users. The following *-area components are available, but no longer recommended. You can use a card when you need an area by using the appropriate card component without specifying the on-click key. For example, a cell-card without an on-click looks and works exactly like a cell-area.
title-area: A container for titles and subtitles. Atitle-areahas five slots that can containtext, aparagraphor asingle-linecomponent, depending on the slot.cell-area: An area that contains a cell, which displays information for a single subject. This has three child keys for slots (slot1,slot2, andslot3); see the discussion of slots below.thumbnail-area: An area that contains a thumbnail image and a title area, displaying information with an image as a secondary component.
The title-area key is also used within other components and should still be used as intended.
Text
Text components display text to users.
paragraph: a paragraph of styled text.single-line: a single line of text that can contain styled text, spacers, and images. Asingle-lineblock can have one or moretext,image, andspacerkeys within it; when it is rendered, they are concatenated into a single display line.textis an interior container for styled text (see below) that can only appear inside other elements such assingle-line.
The paragraph and single-line blocks seem similar, but they have different use cases. A paragraph is a single unit of styled text that can be one or more lines, with wrapping left up to the display device. A single-line always displays as a single line of text, but can include spacers and inline images, letting you build a more complicated line of data. Note that if a single-line component generates more text that can be displayed on the device's screen in one line, it will be truncated with an ellipsis ("…").
Styled text blocks such as paragraph and text have two keys:
valueis the text the user sees. This can contain Expression Language functions.styleis the name of a style for the text. See Styling Components for valid text styles.
Cards
A card is a representation of a single subject or result: for example, a hotel room being booked, or a calendar event. Cards should always have title text, and usually have detail text (for example, a description of the hotel room). In addition, they might have image backgrounds, solid color backgrounds, image thumbnails, and even maps with pins. Most cards can have title-area components.
If you want the card to be tappable, make sure to define an on-click key within the card. When the user taps on the card, you can either execute an intent, navigate to a new view with the view-for key, or navigate to an external URL. If you do not define an on-click, the card is treated like an area.
title-card: a container that in turn contains atitle-area.cell-card: This cell/card hybrid is styled like a cell, and has the same three child keys for slots (slot1,slot2, andslot3) thatcell-areadoes. But, like other cards, it has an optionalon-clickblock.image-card: similar totitle-card, but with animage-urlto let you specify a background image for the card.thumbnail-card: treats the image as a thumbnail that can be given a position on the card rather than as a background image.map-card: a component that holds a static map in your view. Map card includes atitle-areaand an optionalon-clickaction, and also let you setmarkers(map pins).compound-card: a component you can tailor to your needs that includes acontentblock (which can contain most of the non-transactional Views components).
Also, see transaction components, which are variants of cells that allow input for use with transactional workflows.
Make sure that you are following the App Punch-Out policies if your card's on-click definition makes users exit Bixby.
Images
Bixby Views has components to display a single image or multiple images in your view. PNG or JPG image types are recommended for all images.
For a single image, you can add a standalone image in a section's content container or in a compound-card. If you want to add an image with some overlaid text, use an image card. You can also add an inline image in a single-line if you need the image to be in the same span as text.
For a collection of images, you can add these components that allow the presentation of multiple images in carousel or list form:
image-carousel: a component for multiple images, specified as a type or subtype of Image, that can be swiped through horizontally by the user.image-list: a single-line list of multiple images, specified as a type or subtype of Image. If there are more images than can fit on the screen, the user can scroll the list.
Some images in your capsule, particularly icons, might not be visible or legible when set against a light background in Bixby's light theme. You can specify alternate images for the light theme by using the light-theme sub key under url (the image's default URL). There is also a corresponding dark-theme key that can be used if the default icon or image is more visible/legible in the light theme.
Images are only applicable to Result Moments and Confirmation Moments. For images in Input Moments, you can use an image-picker.
Partitions
The partitioned component lets you present multiple rows or lines of data with visual separation between them. It can be used to present lists, tables, and grids.
partitioned: used for visually separated data. It contains an unstyledtitleand acontentblock. Thecontentblock can contain most of the non-transactional view components (cards, cells, titles, and text).hbox: a "horizontal box" container. Anhboxcontains acontentchild, which in turn can only contain one or morevboxcomponents.vbox: a "vertical box" container. This contains controls for horizontal and vertical alignment and acontentblock which can containsingle-line,text, ormacroblocks.
A vbox container must be inside an hbox. You can think of an hbox as a row and vbox as an item in a column. The width of each column is determined by its content; Bixby will try to display the full content of each column. If there is not enough horizontal space to do so, left-aligned columns will be truncated with ellipsis marks (…); if there is still insufficient space, centered and right-aligned columns will be cut off (without the ellipsis to indicate truncation).
Note that hbox blocks do not have to be inside a partitioned block, and partitioned blocks do not have to contain hbox blocks.
Transaction Components
Use transaction components within transactional workflows. They allow users to confirm actions and prompt for selections. For instance, a reservation confirmation for a restaurant might allow the user to change the party size and the reservation time.
input-cell: a cell wrapped in anintent, to allow a selection prompt or an input form to be presented in aconfirmation-view.split-input-cell: a container for twoinput-cellblocks. Asplit-input-cellhas two child blocks,leftandright, which each contain one and only oneinput-cell.
Cell Slots
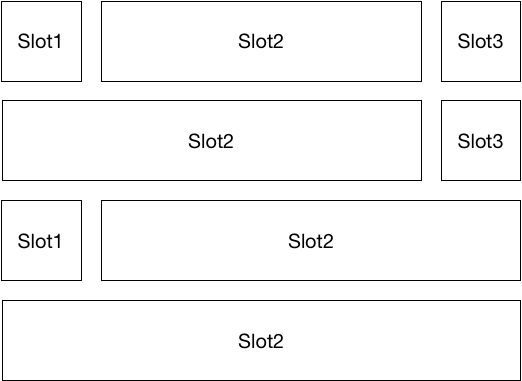
The cell-area and cell-card components have columnar slots for their content, numbered slot1, slot2, and slot3:
slot1appears as a square on the left side of a cell, and can only contain an image;slot2contains acontentblock that hasprimaryandsecondarytext lines (this is not the same as a layout content block);slot3appears as a square on the right side of a cell, and can contain an image and a label.
When you lay out a cell, you can choose to have one, two, or all three slots filled, but slot2 must always be filled. So there are four possible display options:
Audio Component
Use audio-control to create an audio media player component for a podcast, live stream, or audio track. The component can display album or show artwork, metadata such as title and artist, and interactive components to let the user control playback.
This component is only available on mobile devices. Media playing on other devices will use the device-specific controls, if available, to control playback and you will need to create a view for information to display.
Styling Components
Bixby Views offers limited styling of components that remain consistent with the rest of Bixby's design. All text blocks and titles can be given styles that control their size and, in some cases, a choice between normal and "soft" color. (The rendering of "Soft" styles is device-dependent, but generally has less opacity, giving it a dimmer or lighter look depending on its background.)
When styles affect size, they are listed from smallest to largest. All styling components will vary slightly on different devices and scale appropriately. Also, not all devices support all font styles.
For a comparison of the styles below, see the text style reference and the font references pages.
Title Styles
Title_XSTitle_STitle_MTitle_LTitle_XLTitle_XL_SoftTitle_XXLTitle_XXL_Soft
Detail (Body Text) Styles
Detail_MDetail_M_SoftDetail_LDetail_L_Soft
Other Styles
Legal
The Legal text style primarily should be used for legal content, such as copyrights, disclaimers, or terms of service.
Image Adjustments
For a standalone image or an image in a thumbnail-card, you can set the aspect-ratio of the image to the same aspect-ratio of a card.
For images that are in-line with other content either horizontally (single-line) or vertically (vbox), image sizes can be set to any of the style names for Title and Detail. The image has the same height as the font size of the specified style. You should match image styles to the styles of their accompanying text, although the _Soft suffix will not affect the image's display.
These ratios only apply to mobile. Image ratios on watch devices are fixed.
Additionally, you can change the position and alignment of some images using the following keys:
image-object-fitfor images in cards orobject-fitfor standaloneimagecomponents. This changes how your image fits within the confines of the component.image-object-positionorobject-positionfor standaloneimagecomponents. This changes the alignment of the image.
If you need to adjust the background of an image to either Transparent, Black, or White, you can use either image-background-color for images in cards or background-color for standalone images.
If you need to make an image tappable and show it in lightbox mode, you can use the lightbox-enabled key to indicate to the user that the image is tappable.
Image Shapes
For a comparison of the shapes, see the shape reference page.
CircleSquare
Card Aspect Ratios
You can specify the following aspect ratios for the map-card and image-card. For a visual comparison, see the aspect-ratio reference page.
21:916:94:31:13:49:169:21
Dividers
You can add a divider between content child components in compound cards and in section content components.
Design Guides and References
If you want to know which components to use during which moment in your conversation flow, you can read the Designing With Bixby Views guide.
If you want to know the design specifications of the various components, you can read more in the Design Components Design Guide and play with the interactive demos available.