
Quick Start Guide
Ready to create your own capsule? Follow this quick start guide to get started.
This guide shows you the basics of the Bixby platform. You'll learn how to do the following:
- Add the building blocks for your capsule through concepts and actions. Concepts create the building blocks of your capsule, while actions define what actually gets done.
- Implement JavaScript for your action, which performs the computation for your capsule.
- Add views and dialog. Views are design elements that determine how information is presented. Dialog is how Bixby will speak to the user.
- Finally, teach Bixby about user statements and questions through training.
Let's get started and build something! We'll create a capsule that lets the user roll dice. With this, you can choose how many dice to roll and how many sides are on each dice. So, for example, if you were to ask "roll 2 6-sided dice", Bixby would respond with a sum of the dice rolls as well as the number on each dice.
Download and Install Bixby Developer Studio
If you haven't already, download and install Bixby Developer Studio. (For more information about Bixby Developer Studio, including minimum system requirements, read Using Bixby Developer Studio.)
After starting Bixby Developer Studio, click the Log In button. Bixby Developer Studio then shows the Samsung authentication page.
Log in using your Samsung Account credentials. If successful, the authentication page then shows Login successful.
Select the launch button in the authentication page. Bixby Developer Studio launches, connects, and sets up your workspace. When Bixby Developer Studio shows Ready in the lower-left corner, you're ready to start.
Create Your Capsule
Once you've installed Bixby Developer Studio, you are ready to create your capsule. Bixby uses concepts and actions to help determine user intent and decide on a goal. It then creates a plan to reach that goal, essentially writing a new program in the process. Bixby runs this program to decide what to do next: show results, interact with the user, or build and run another plan.
The first step is to create a new capsule! You normally would create these yourself within Bixby Developer Studio using File > New Capsule, but since we're just getting started, we've gone ahead and created these files for you.
Select File > New Capsule from Sample, scroll down, and select the Dice Capsule.
You can also clone the GitHub repository for the capsule:
https://github.com/bixbydevelopers/capsule-sample-dice/
After cloning, select File > Open Capsule and select the directory you've extracted the capsule to.
Add Concepts and Actions
Now that you've opened your capsule, let's take a closer look. Let's start with what we call concepts and actions. Concepts and actions are the building blocks of a capsule. Concepts explain what Bixby knows. You can think of them as variables or inputs. Actions determine what Bixby can do, which you can think of as the verb or method. For this dice capsule, we have the following files containing concepts and actions, which are located in models/:
primitives/: Primitives represent simple types like integers, booleans, decimals, and text. All the primitives in this capsule are integers.NumDice.model.bxb: Integer for the number of dice in a roll.NumSides.model.bxb: Integer for the number of sides on each dice.Roll.model.bxb: Integer for the result of each roll.Sum.model.bxb: Integer for the sum of all dice rolls.
structures/: A structure concept is a record that holds multiple primitive concepts.RollResult.model.bxb: This is used to track key-value objects, representing the results of a roll or rolls. It contains properties for thesumandroll. Therollproperty can take more than one value if there are multiple rolls.
actions/:RollDice.model.bxb: Contains an action that takes the two inputs (numDiceandnumSides) and produces an output of typeRollResultConcept. Actions allow you to define an operation that Bixby can do on behalf of the user.
Of these concepts, numDice (of type NumDiceConcept) and numSides (of type NumSidesConcept) are the two inputs required for this capsule to work.
Let's take a closer look at the NumDice.model.bxb file, which defines the NumDiceConcept concept:
integer (NumDiceConcept) {
  description (The number of dice to throw.)
}You see that NumDiceConcept is set as an integer with an optional description. If you open many of the other files in the primitives folder, you'll see code that is very similar.
The exception is RollResult.model.bxb, which contains a structure concept used to track the sum and roll. The first property is for the total sum of all the dice rolled. The second property holds the list of each dice roll. Because we want each property to be available after a RollDice call, they are both required (min (Required)). There will only be a single sum value (max (One)), but the roll property can hold many values, one for each roll of a dice, so we'll use max (Many).
structure (RollResultConcept) {
  description (The result object produced by the RollDice action.)
  property (sum) {
    type (SumConcept)
    min (Required)
    max (One)
  }
  property (roll) {
    description (The list of results for each dice roll.)
    type (RollConcept)
    min (Required)
    max (Many)
  }
}
Test the Capsule
Now that you've added the capsule files, you are ready to test it out!
Open the Simulator (View > Open Simulator).
Enter the following intent, which is a structured representation of the user's request, into the Simulator's input box on the left side of the window.
intent {
  goal: example.dice.RollResultConcept
  value: example.dice.NumSidesConcept (6)
  value: example.dice.NumDiceConcept (2)
}
Click the Run Intent button.
You'll see a result like the following:
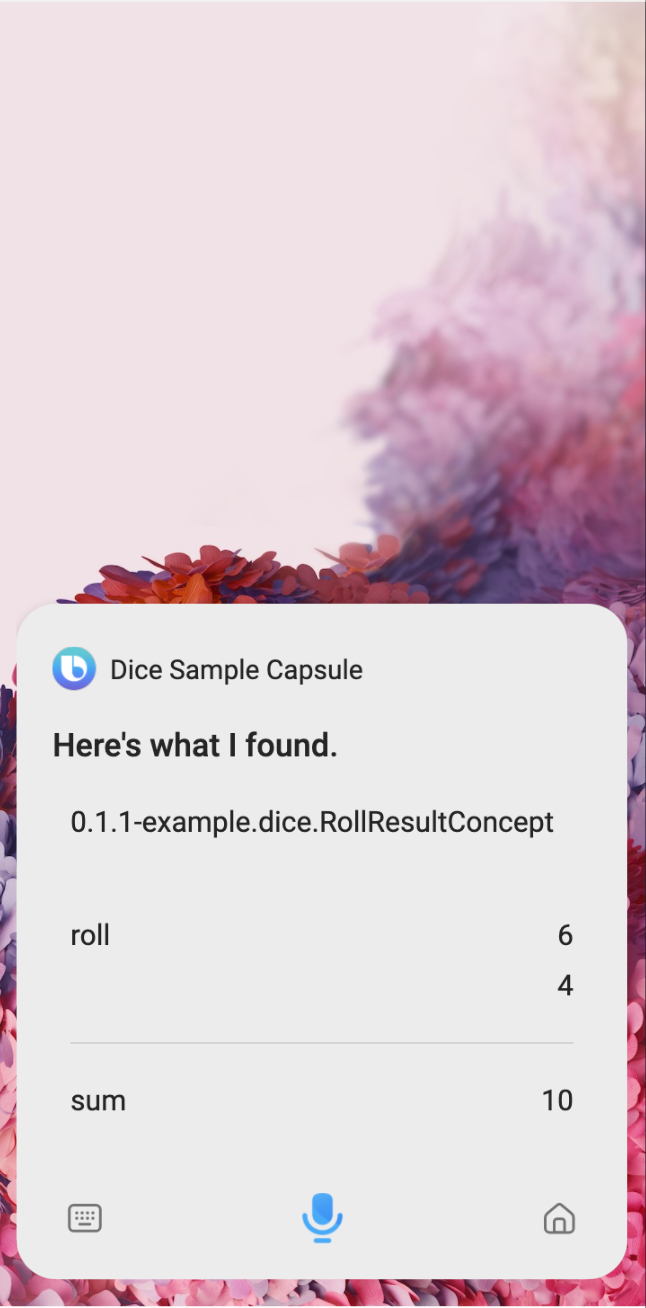
Congratulations! You just tested your first capsule on Bixby! In the example above, each roll was 6 and 4, respectively.
Now let's step back and see what you did. The intent you executed is Bixby's way of understanding what the user wants. At a minimum, it must have a goal. Normally, it also has values, which are constraints or clues provided by the user.
Open the Debug Console by pressing the Debug Console button [![]() ] in the Simulator. Notice that after you execute the intent, Bixby creates an execution graph in the Debug Console that shows the inputs (
] in the Simulator. Notice that after you execute the intent, Bixby creates an execution graph in the Debug Console that shows the inputs (NumDiceConcept and NumSidesConcept) that lead to the action RollDice, and finally the goal RollResultConcept.
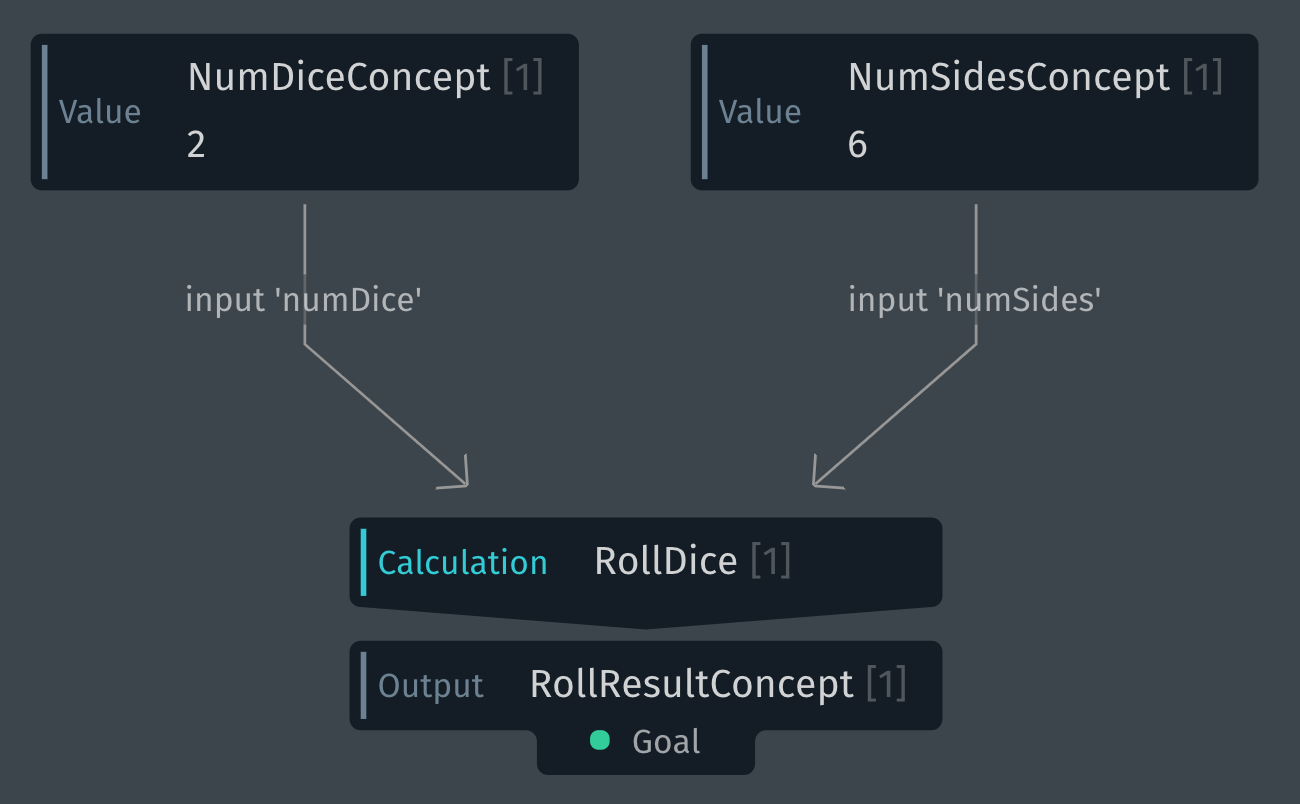
In this case, Bixby only needs to perform one action. But in other cases, like buying airline tickets, there will be multiple inputs and actions.
Let's take a look at the other parts of the capsule that you need.
JavaScript (*.js)
While concepts and actions form the skeleton of your capsule, JavaScript functions are the muscle. In your dice roller, we've already included a JavaScript file, RollDice.js, that does some basic computation. It takes the two inputs, generates a random number, then computes both the sum and the result of each dice roll. You can find JavaScript files in the code/ folder of the capsule.
To be able to access that JavaScript, we've also included an endpoints declaration (endpoints.bxb), which allows you to access local and remote JavaScript functions as an endpoint.
Views (*.view.bxb)
After you roll the dice, Bixby uses views to know how to present the results. By default, Bixby produces a generic table that is useful for debugging, but one that you wouldn't want users to see. We've provided two prefilled input view files (NumDice_Input.view.bxb and NumDSides_Input.view.bxb). Also included is an empty result view file (RollResult.view.bxb) that you will complete to customize how the users will see the dice roller results.
Views are placed in the resources/ folder of a capsule, usually in a locale subfolder such as en/.
Training
At the beginning of this guide, you used an intent to execute the query. In real life, however, users communicate using natural language like "roll 2 4-sided dice" or even "roll some dice". Therefore, you'll need to add some training examples to ensure Bixby can handle natural utterances in the dice roller.
Add a View
First, let's add a view so that you can customize and format your results in a more pleasing way.
Open
RollResult.view.bxbfrom the file navigator in theresources/en/views/folder.Add the following code:
result-view {
match {
RollResultConcept (rollResult)
}
render {
layout {
section {
content {
single-line {
text {
style (Detail_M)
value ("Sum: #{value(rollResult.sum)}")
}
}
single-line {
text {
style (Detail_M)
value ("Rolls: #{value(rollResult.roll)}")
}
}
}
}
}
}
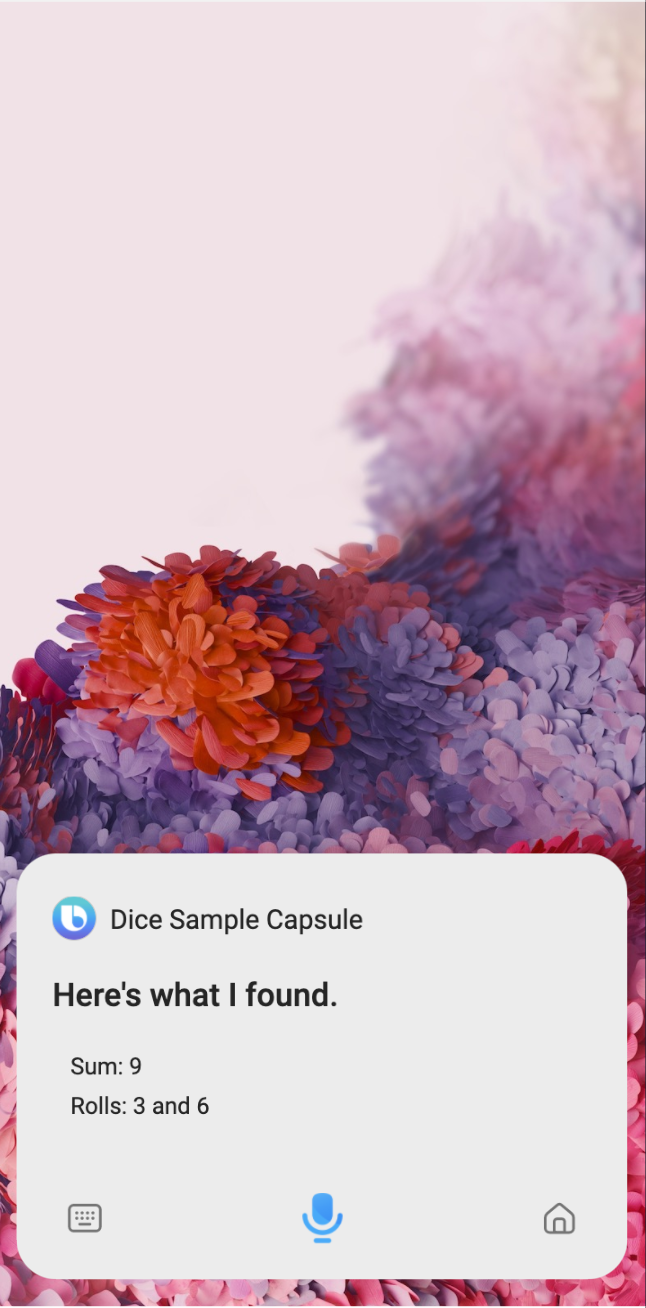
}There are different ways in which you can set the user interface. In this example, we're using
result-view, since we're displaying results. The results of the dice roll are contained in thevaluekeys, which use Expression Language (EL) to display the value ofrollResult.sumfor the total androllResult.rollfor each individual die roll.When presenting
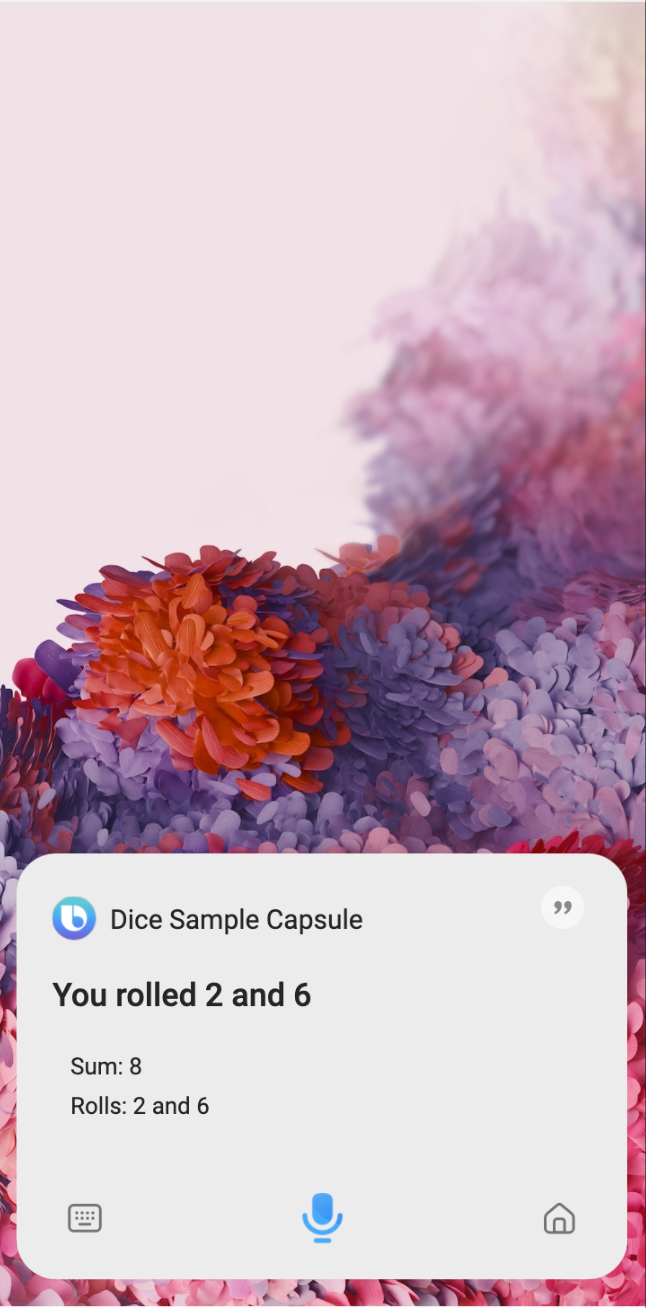
RollResultConcept, a match pattern determines how this view is selected among others. You can learn more about match patterns in the Developers' Guide.After updating the view, execute the intent once more in the Simulator:
// Give two values (number of dice and number of sides) with the
// goal of rolling dice
intent {
  goal: example.dice.RollResultConcept
  value: example.dice.NumSidesConcept (6)
  value: example.dice.NumDiceConcept (2)
}
If you're away from the Simulator for too long, your session might time out. Click on the main Simulator window to start a new conversation. If you get a warning about the capsule content being out of sync, recompile the capsule by clicking Compile. You can also click the Reset button to reset the conversation with Bixby and clear any context it might have.
You should now see the updated view appear in the results:
Add Dialog
Next, add some dialog to improve the way Bixby refers to various concepts within the dice roller. While views and layouts help you customize how Bixby presents information, dialog files help customize how Bixby talks back.
For example, if Bixby needs to reference a concept, by default it will use the concept name when no dialog file can be found. In the following example, if a user fails to give Bixby a number of dice to roll, Bixby has to prompt the user for more information. Here is what that prompt would look like:
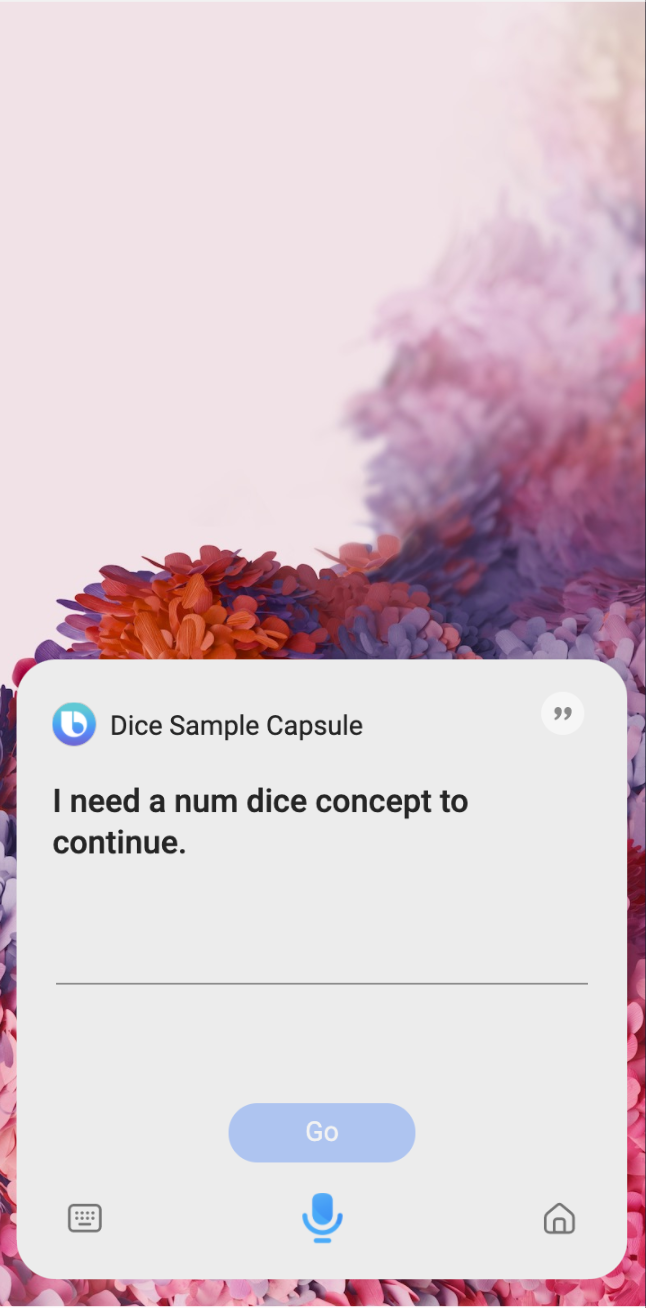
Notice that it says it needs a "num dice concept". You can create a dialog file to help catch these instances and use a better phrase instead to reference this concept.
Open
NumSides.dialog.bxbfrom the file navigator. It's in theresources/en/folder.Add the following code:
dialog (Concept) {
  match {
    // Look for this type
    NumSidesConcept
  }
  // Use the following template text with this type
  template ("number of sides")
}
As with the view file, this dialog uses a match pattern to look for a
NumSidesConcepttype and replaces the default dialog for that concept with the template text.Open
NumDice.dialog.bxbfrom the file navigator.Add the following code:
dialog (Concept) {
  match {
    // Look for this type
    NumDiceConcept
  }
  // Use this template text with this type
  template ("number of dice")
}
Here is that same prompt with the improved dialog:

Views also allow you to define what Bixby says to the user with the message key. Let's add a message to give a better, more conversational response to users:
Open
RollResult.view.bxbfrom the file navigator in theresources/en/views/folder.Change the
matchblock so it captures the output of theRollDiceaction asrollOutputby using thefrom-outputkey:match {
RollResultConcept (rollResult) {
from-output: RollDice (rollOutput) // Add this match pattern
}
}Add a
messageblock directly under thematchblock, which chooses responses randomly, including the value captured asrollResultin the messages:message {
// customize dialog if rolling only one die
if (rollOutput.numDice == 1) {
template ("You've got a ${value(rollResult.roll)}!!!")
}
// randomly choose a message if rolling 2-9 dice
if ((rollOutput.numDice > 1)&& (rollOutput.numDice <= 10)) {
choose (Random) {
template ("The sum is ${value(rollResult.sum)}")
template ("You rolled ${list(rollResult.roll, 'value')}")
}
}
// choose a custom message if rolling more than 10 dice
if(rollOutput.numDice > 10) {
choose (Random) {
template ("Woah! High roller!")
template ("${value(rollOutput.numDice)} dice?! You were made for Vegas!")
}
}
}Notice that we're using conditional
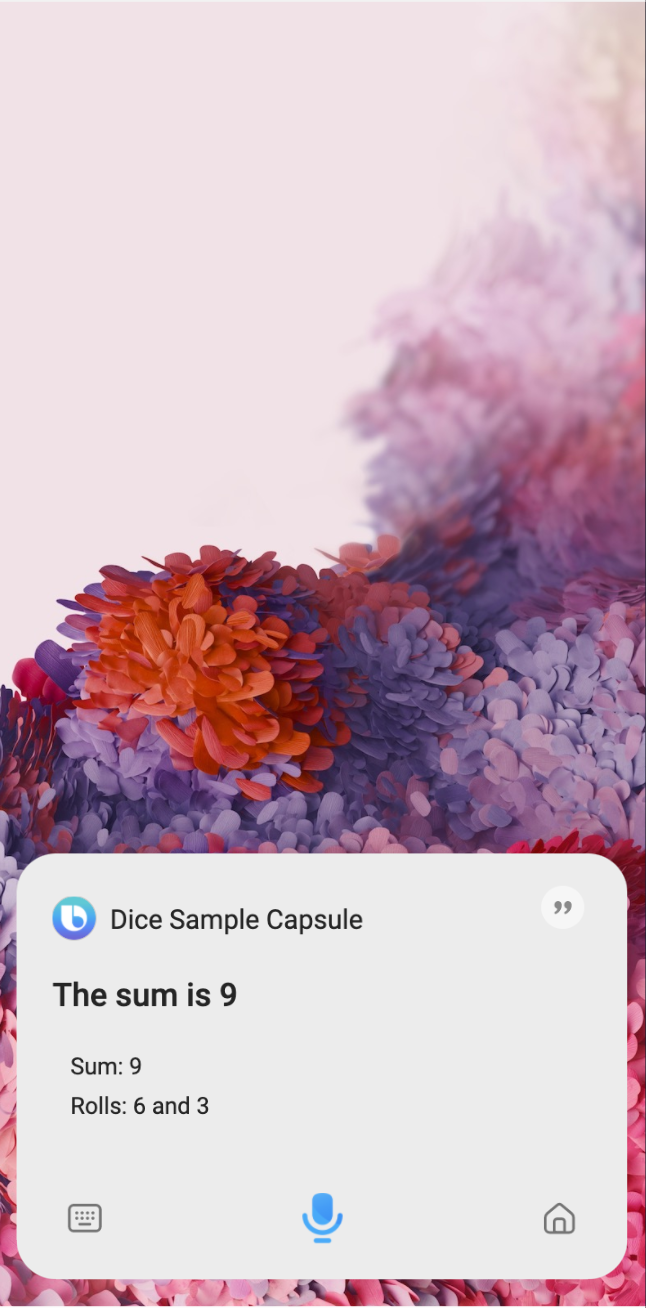
ifrules here to ensure that the dialog is accurate based on whether the user rolls one or more dice. We also ensure that if the user chooses more than 10 dice, the dialog doesn't take up too much room.After adding dialog, execute the intent once more in the Simulator.
// Give two values (number of dice and number of sides) with the goal of
// rolling dice
intent {
  goal: example.dice.RollResultConcept
  value: example.dice.NumSidesConcept (6)
  value: example.dice.NumDiceConcept (2)
}
You should now see the updated dialog appear similar to the following results, randomly choosing one of the two template texts that you added above:
Add Training Examples
Finally, add some natural language training examples so that Bixby is ready for different kinds of user input.
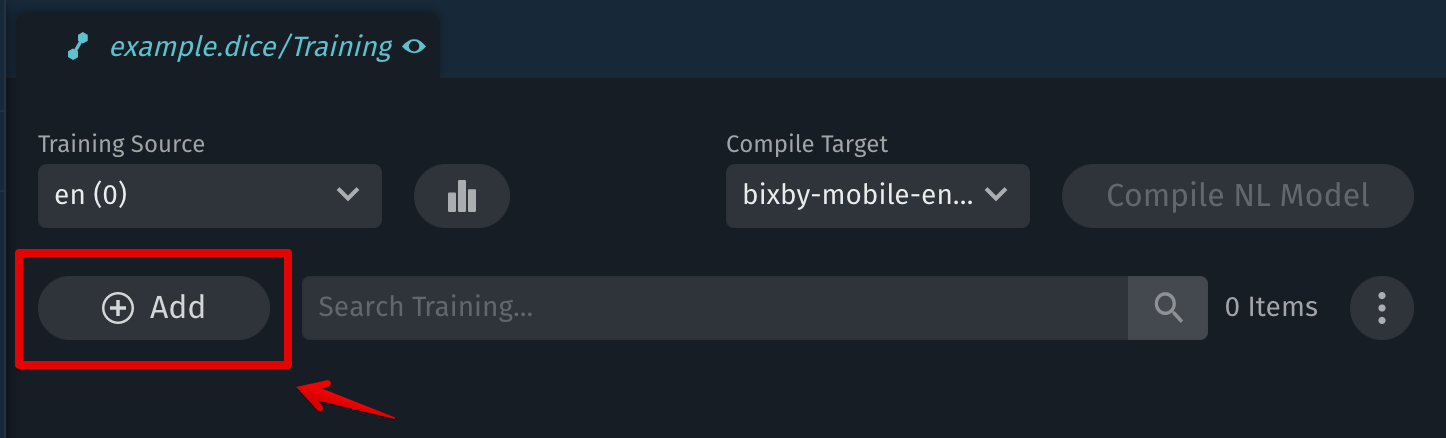
Select Training in the Files view of the Bixby Developer Studio sidebar.
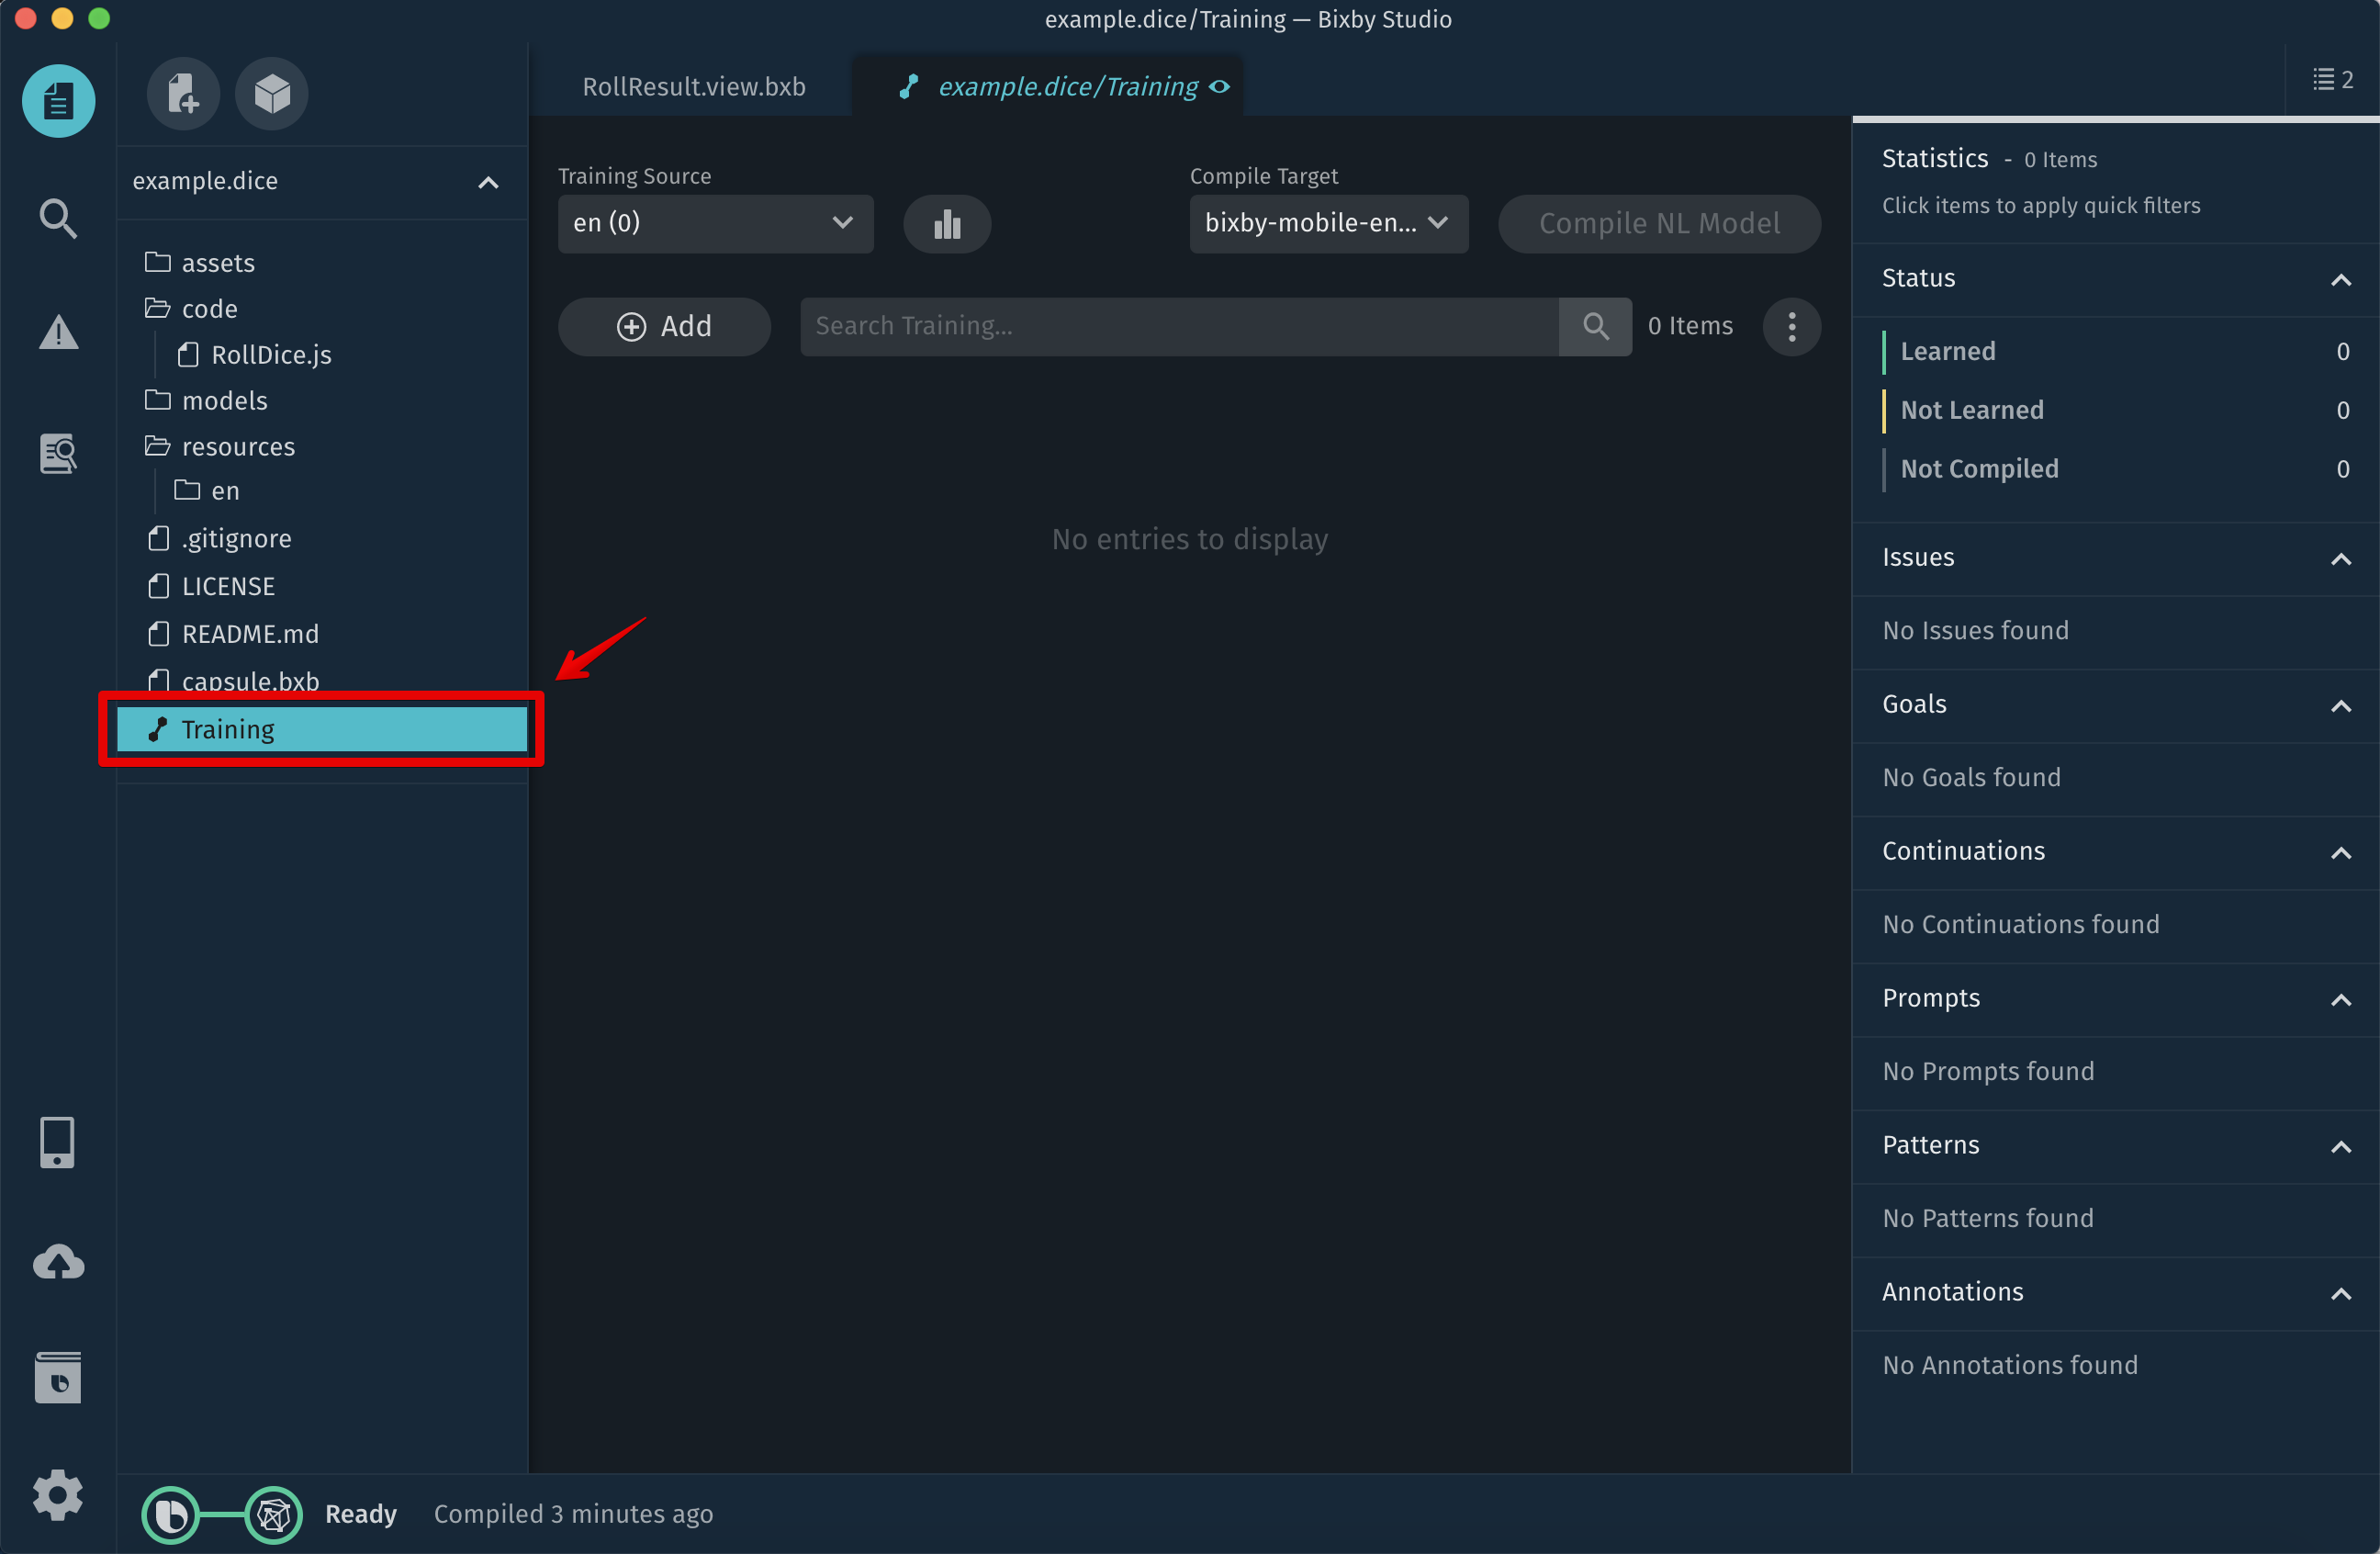
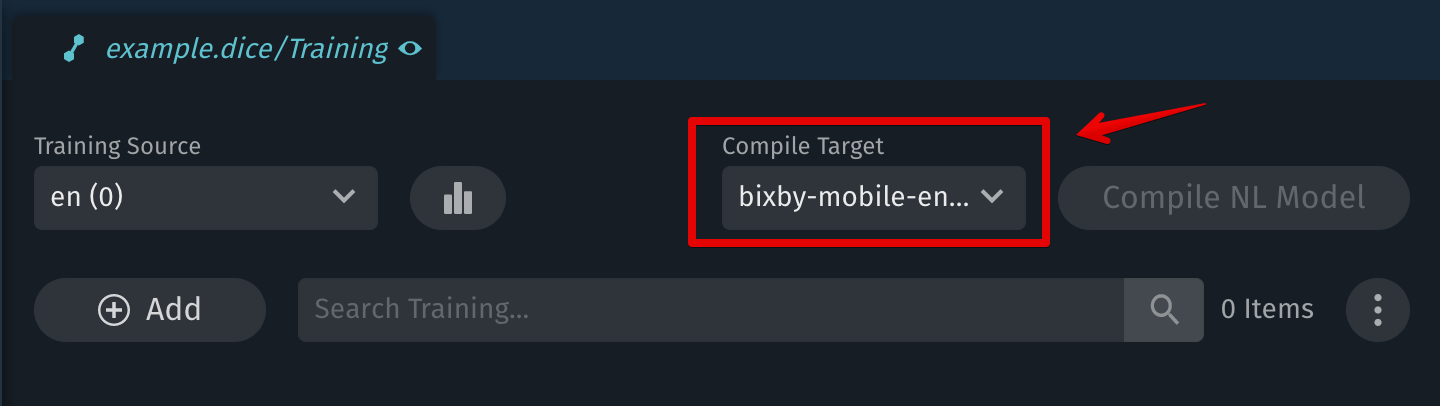
Select the bixby-mobile-en-US compile target.
Click the + Add button on the left side of the training tool to add a new training example:
Type
Roll 2 6-sided diceas the natural language utterance within the NL area as shown below, then click the Add button: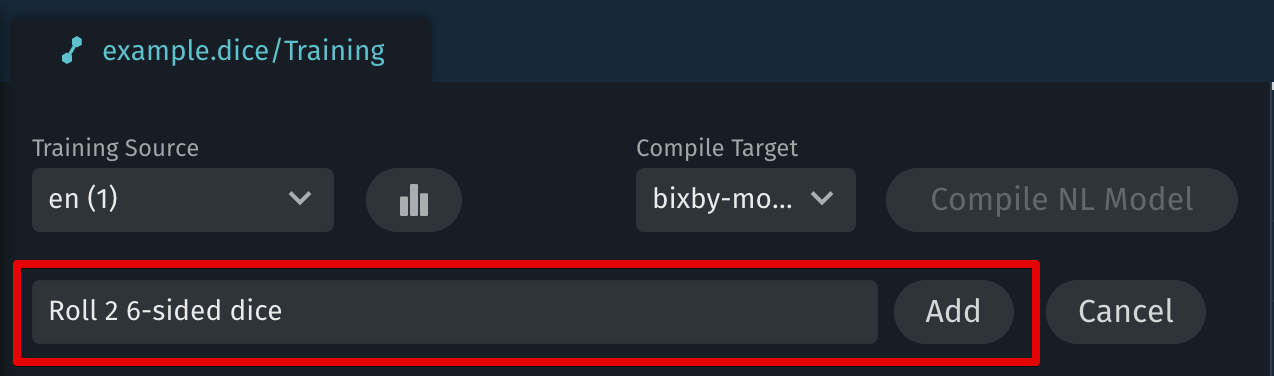
The training entry editor will appear after you add the NL utterance. Add
RollResultConceptwithin the Goal field. You can type it or use the autocomplete to select the model from the list: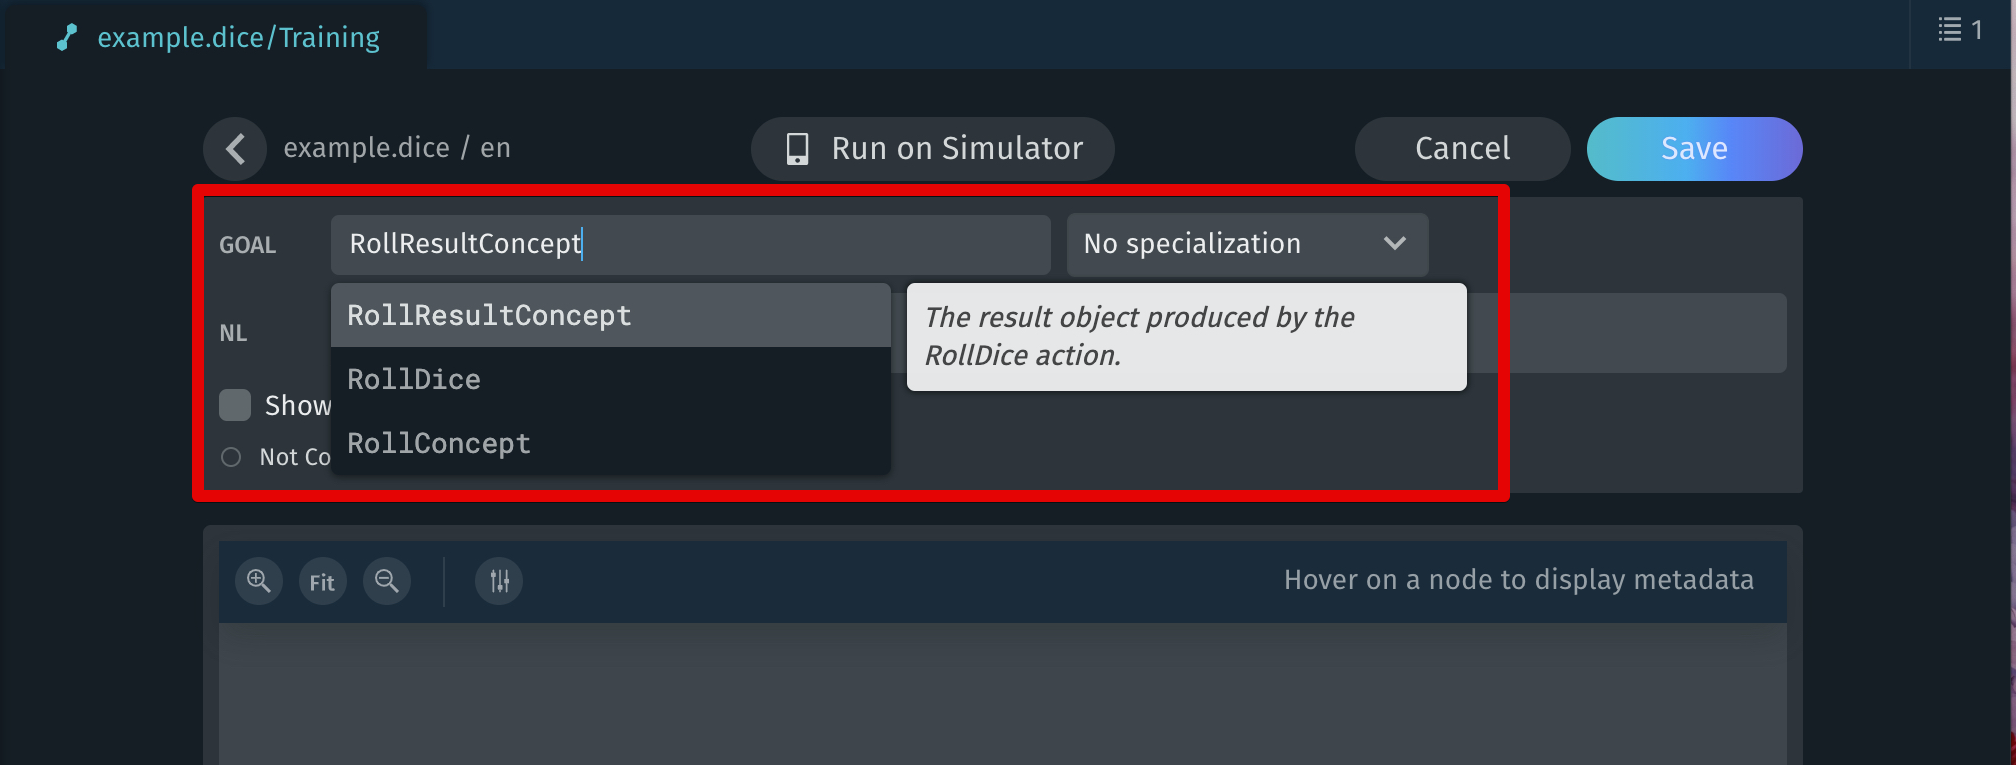
In the NL field, highlight 2. Notice that the Annotations panel pops up. Click on the Value tab to indicate that "2" is a value that you want to annotate.
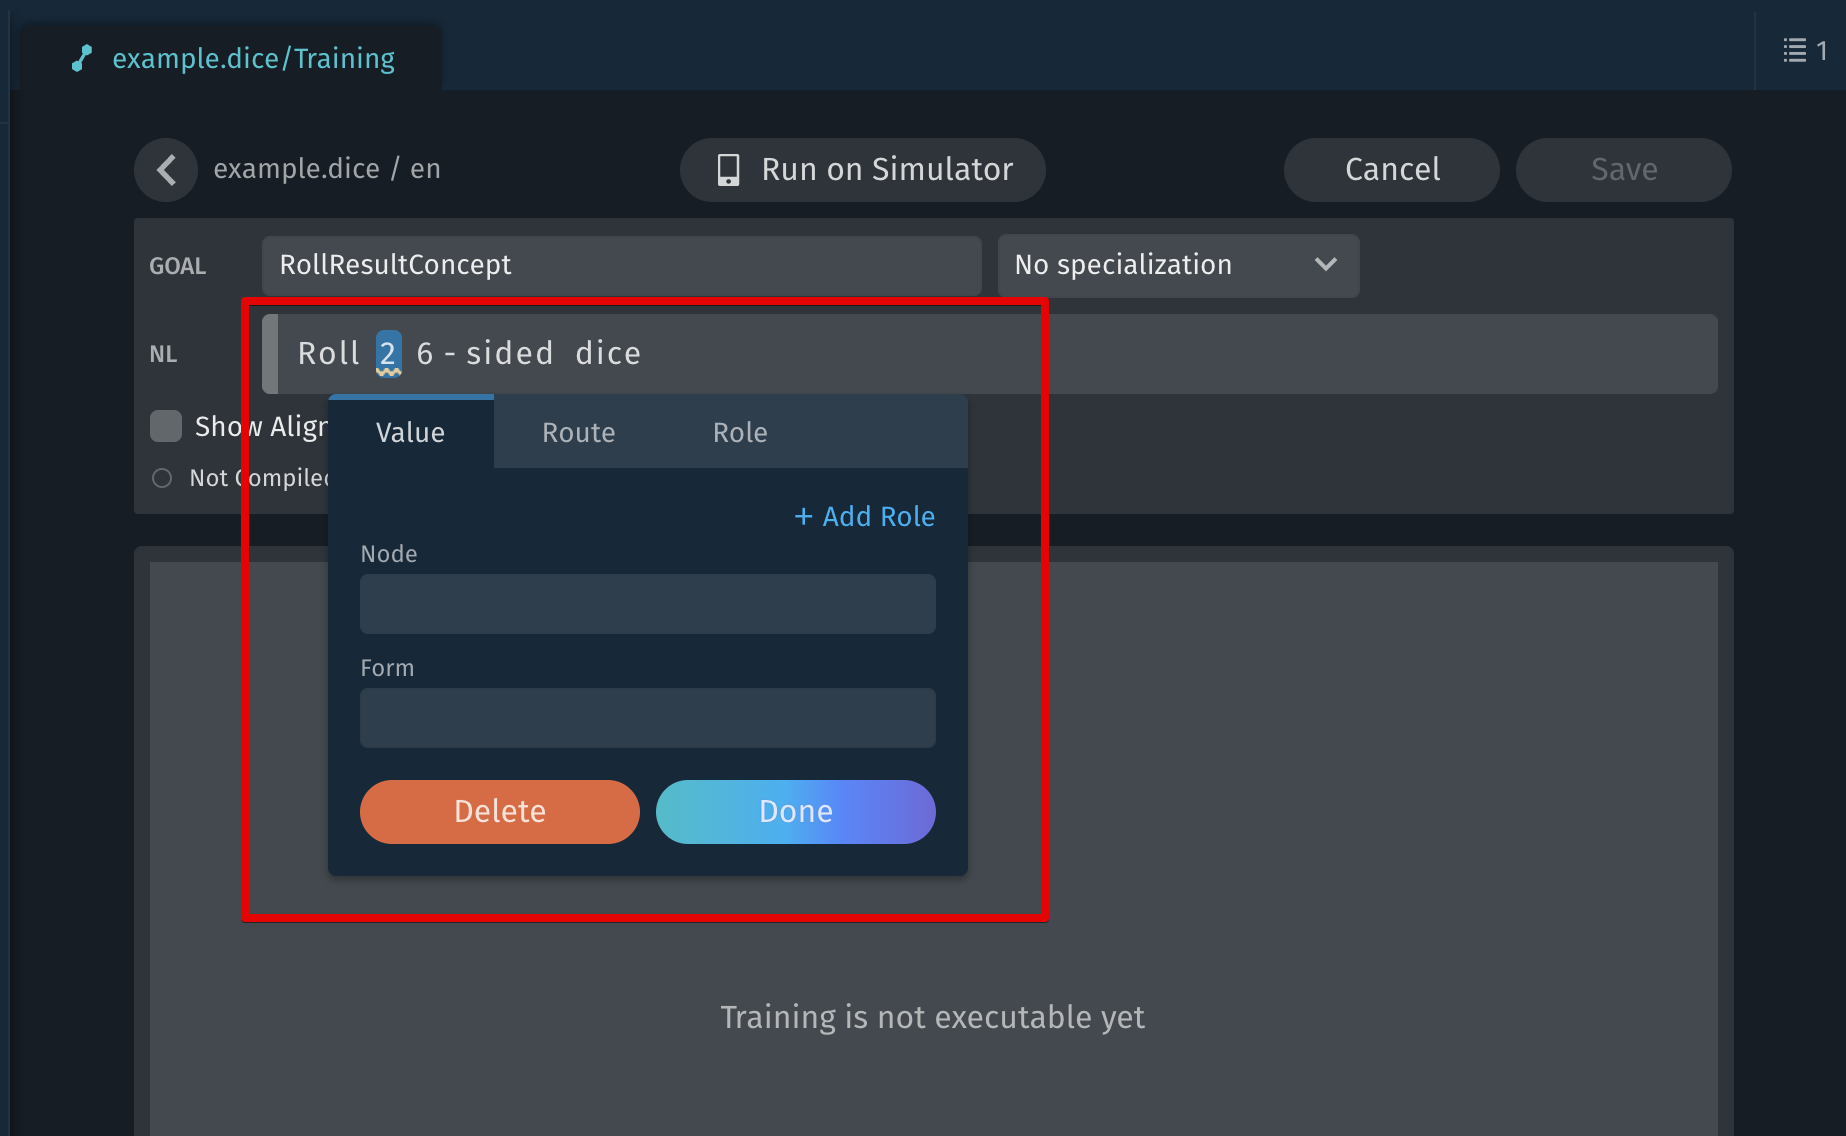
Add
NumDiceConceptin theNodefield that appears in the Annotations panel, and then click Done in that panel. Again, you can either type the full name or choose from the autoselect list.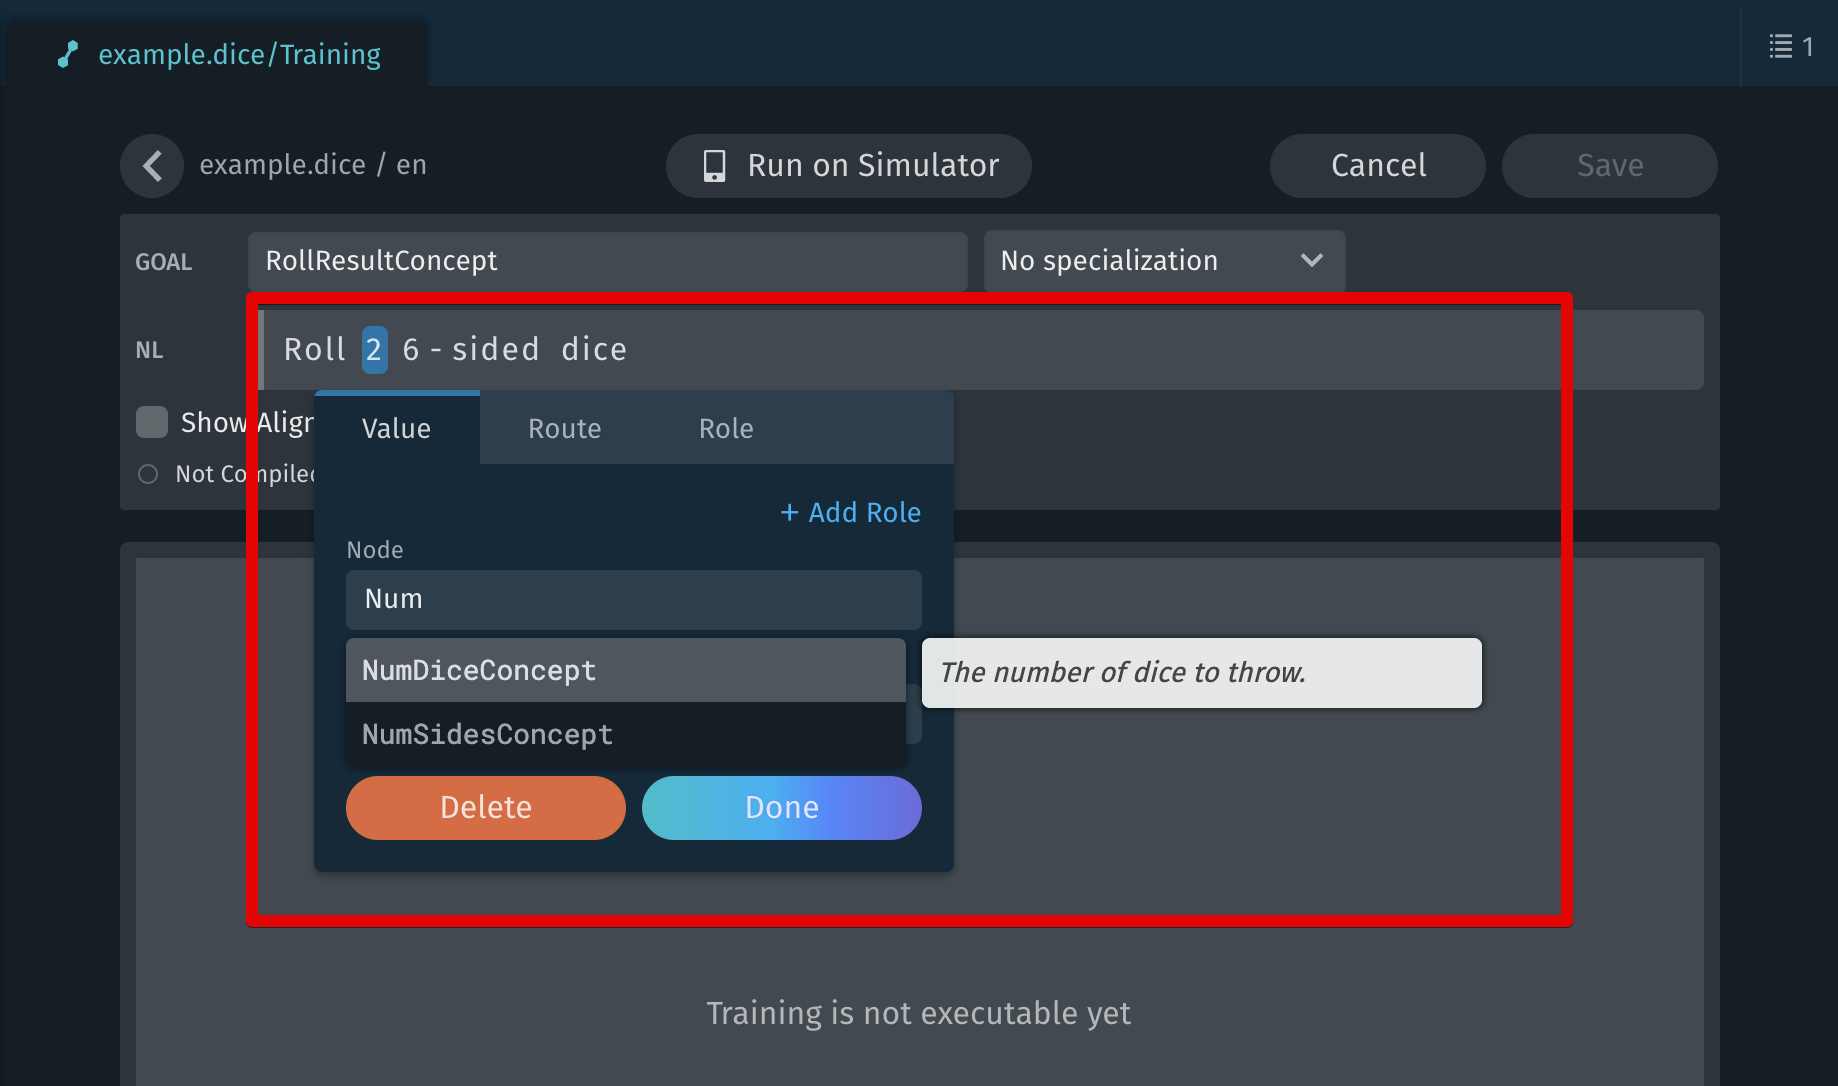
Repeat the last two steps for
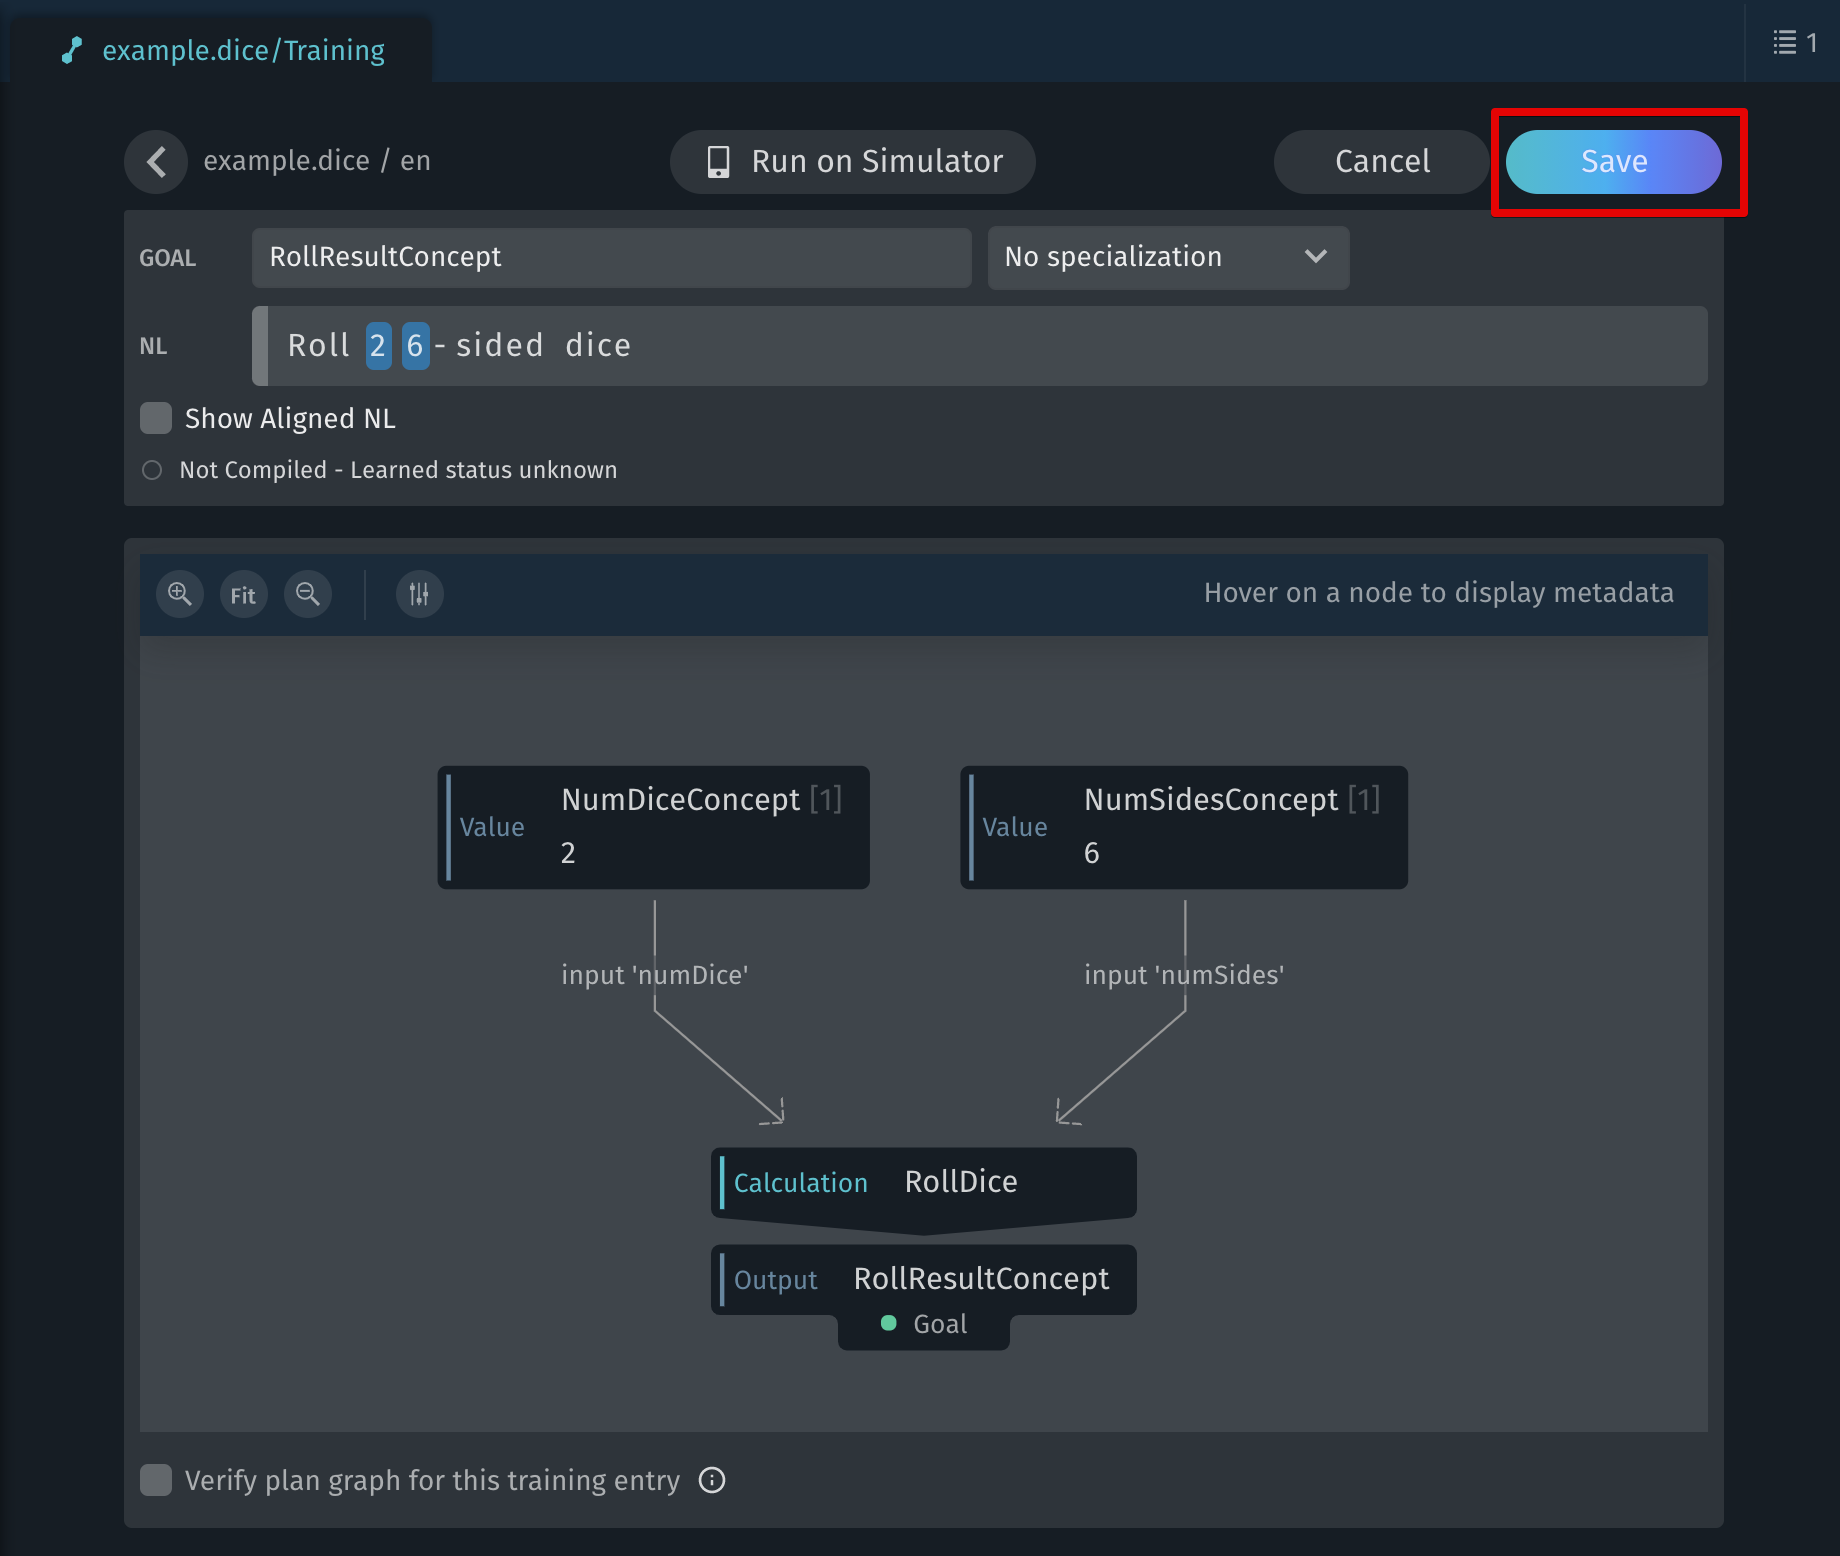
6asNumSidesConcept: in the NL field, highlight 6, click on the Value tab, and addNumSidesConceptin theNodefield in the Annotations panel.You should see a plan graph that Bixby will execute with the training example given, using the values you highlighted and the goal specified.
Click Save in the training entry editor in the upper right corner.
You've created your first training example for Bixby to use!
Test Training
Now that you have added training, you need to compile the natural language (NL) model so Bixby will learn the utterance for which you added training. Click the Compile NL Model button in the upper right corner of the Training tab and wait for the model to compile.
Go back to the Simulator and enter the following utterance in the input box. (Delete the intent first if it's still there.)
roll 2 6-sided diceClick Run NL. The utterance will now run in the Simulator. Try typing other variations in the simulator's input box, such as "roll 4 8-sided dice".
Optional Steps
You now have a working capsule with training. Here are some optional steps to make your dice capsule smarter by providing default input values and checking for invalid input.
Add Default Values (Optional)
The dice roller currently works only if you specify two inputs: the number of dice and the number of sides to a dice. But what if a user doesn't provide those numbers?
Try running this intent, which does not provide values, in the Bixby Simulator:
intent {
  goal: example.dice.RollResultConcept
}
Notice that Bixby now prompts the user because it expects a minimum number of inputs to fulfill the goal.
To address this, add default values using default-init in your capsule so that Bixby can automatically provide values when the user provides none.
Open
RollDice.model.bxbfrom the file navigator.Replace the current code with the following:
action (RollDice) {
  // specify this action as a calculation
  type (Calculation)
  // add a required input for the number of dice that defaults to 2.
  collect {
    input (numDice) {
      type (NumDiceConcept)
      min (Required)
      max (One)
      // add a default value of two dice
      default-init {
        intent {
          goal {NumDiceConcept}
          value {
            NumDiceConcept (2)
          }
        }
      }
    }
    // add a required input for the number of sides that defaults to 6.
    input (numSides) {
      type (NumSidesConcept)
      min (Required)
      max (One)
      // add a default value of six sides per dice
      default-init {
        intent {
          goal {NumSidesConcept}
          value {
            NumSidesConcept (6)
          }
        }
      }
    }
  }
  // set the output of this action to "RollResultConcept"
  output (RollResultConcept)
}
Now execute the same intent again:
intent {
  goal: example.dice.RollResultConcept
}
Bixby no longer prompts because you added default values that were filled in when none were provided by the user:

Your training doesn't take advantage of the default values for the number of dice and number of sides, because the only utterance you've added training for so far includes both of them. Try adding new training examples on your own to handle these cases.
Add Input Validation (Optional)
Finally, let's ensure that values the user provides to the dice roller are valid. For example, you wouldn't want users to say they want zero dice with only one side.
Open
RollDice.model.bxb, if it is not already open.Replace the current code with the following:
  action (RollDice) {
    type (Calculation)
    collect {
      input (numDice) {
        type (NumDiceConcept)
        min (Required)
        max (One)
        default-init {
          intent {
            goal { NumDiceConcept }
            value {
              NumDiceConcept (2)
            }
          }
        }
        // add a validation dialog prompt when the user indicates less
        // than 1 dice.
        validate {
          if (numDice < 1) {
            prompt {
              dialog {
                template ("You must have at least one dice.")
              }
            }
          }
        }
      }
      input (numSides) {
        type (NumSidesConcept)
        min (Required)
        max (One)

        default-init {
          intent{
            goal { NumSidesConcept }
            value {
              NumSidesConcept (6)
            }
          }
        }
        // add a validation dialog prompt when the user indicates less
        // than 2 sides.
        validate {
          if (numSides < 2) {
            prompt {
              dialog {
                template ("A dice must have at least 2 sides.")
              }
            }
          }
        }
      }
    }
    output (RollResultConcept)
  }
Notice that this code includes
validate, which includes anifstatement to check for specific numbers.To test out your latest additions, use the following intent with an invalid number for sides and dice:
intent {
  goal: example.dice.RollResultConcept
  value: example.dice.NumSidesConcept (1)
  value: example.dice.NumDiceConcept (0)
}
The result now produces a more informative prompt:

Video Tutorial: Hello World
The following tutorial shows how to get started with Bixby by creating a simple "Hello World" capsule from scratch.
Next Steps
You've now created your first capsule complete with concepts, actions, JavaScript, dialog, layout, default values, validation, and training. This guide covers just the basics of each of these components. For a deeper dive into the Bixby Platform, start exploring the Developers' Guides, which cover all these elements in more detail as well as other aspects of the platform. Here are some specific topics to look into:
- Introduction to Modeling
- Implementing Actions in JavaScript
- Training for Natural Language
- Building Bixby Views
- Refining Dialog
In addition, the Design Guides go deep into the User Experience (UX) of capsules, including how to best structure conversations and views across multiple devices that Bixby supports.
If you'd like to delve more deeply into code, we recommend working through the Advanced Tutorial. The Developer Center has a wide selection of sample capsules and walkthroughs to help you understand features of the Bixby Platform.
If you are a visual learner, you can watch one of our many videos, which range from beginner to more advanced topics.
The Bixby Developers GitHub account has a completed version of the Dice capsule here:
https://github.com/bixbydevelopers/capsule-sample-dice-complete/
If you have any issues with the Quick Start Guide, you can check your code against that repository, or clone it and open it in Bixby Studio.